During home inspections throughout our area, one of the most common—and most overlooked—defects I find is missing kickout flashing. If you’ve never heard of kickout flashing, you’re not alone. Most homeowners have no idea what it is, yet its absence can cause thousands of dollars in hidden water damage to your home’s walls, framing, and foundation.
If your home inspector reports “missing kickout flashing” in your inspection report, don’t brush it off as a minor detail. This small but critical component protects your home from serious water intrusion that leads to wood rot, mold growth, and structural damage you won’t see until it’s extensive and expensive.
What Is Kickout Flashing?
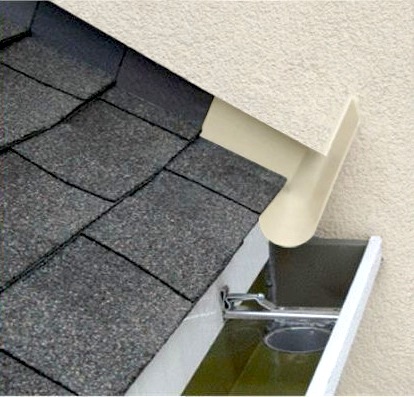
Kickout flashing (also called diverter flashing) is a specially shaped piece of metal flashing installed where a roof edge meets a sidewall. Its job is simple but crucial: redirect water away from the wall and into the gutter system.
The problem it solves: When a sloped roof terminates at a vertical wall—common at dormers, additions, porch roofs, and garage attachments—water running down the roof naturally wants to continue straight into the wall rather than turning 90 degrees into the gutter. Without kickout flashing, gallons of water pour directly behind your siding at this vulnerable junction, soaking wall cavities with every rain.
How it works: Kickout flashing is an L-shaped or specially formed metal piece that “kicks” water out away from the wall and directs it into the gutter. Think of it as a slide that catches roof runoff at the critical transition point and channels it safely into the gutter rather than allowing it to disappear behind your siding.
Where Kickout Flashing Is Required
You need kickout flashing anywhere a sloped roof edge meets a vertical wall, including:
Dormer Transitions: Where dormer roofs meet the main house walls—extremely common in Winchester’s varied architectural styles, especially Cape Cods and colonials with second-floor dormers.
Roof-to-Wall Junctions: Where porch roofs, garage roofs, or addition roofs connect to main house walls.
Deck or Patio Roof Terminations: Where covered deck or patio roofs attach to the house.
L-Shaped Roof Configurations: Any roof design creating perpendicular wall-to-roof intersections.
Bay Window or Bump-Out Roofs: Where small roof sections protecting architectural features meet walls.
Basically, if you have a roof edge that dumps water directly at a wall corner, you need kickout flashing.
Why Kickout Flashing Is So Important
The consequences of missing kickout flashing are serious and progressive:
Wood Rot: Water repeatedly soaking wall framing, sheathing, and trim causes wood rot. By the time you notice exterior damage—peeling paint, soft wood, visible deterioration—the interior framing is often extensively rotted.
Mold and Mildew: Constant moisture inside wall cavities creates perfect mold growth conditions. This mold can spread throughout wall assemblies, affecting indoor air quality and requiring expensive remediation.
Structural Damage: Rotted wall framing compromises structural integrity. Studs, headers, and sill plates weakened by rot may require replacement—a major repair involving opening walls, temporary support, and reconstruction.
Foundation Issues: Water pouring off roofs without proper diversion saturates soil around foundations, contributing to basement moisture, foundation settlement, and drainage problems.
Interior Damage: Eventually, water finds its way inside, causing ceiling stains, wall damage, flooring issues, and ruined insulation.
Insect Infestation: Carpenter ants and termites love rotted wood. Missing kickout flashing creates the damp conditions these pests seek, potentially leading to additional damage beyond the water intrusion itself.
Why It’s Often Missing
Kickout flashing wasn’t always standard practice, and even today it’s frequently omitted:
Older Homes: Winchester homes built before the 1990s rarely have kickout flashing. It simply wasn’t common practice or required by building codes at the time.
Poor Installation Practices: Even when builders know kickout flashing is needed, it’s sometimes skipped to save time or money. It requires careful custom fabrication and installation—easier to skip than do properly.
Homeowner Additions: DIY or contractor-built additions, porches, and garages frequently lack proper kickout flashing because installers don’t understand its importance.
Gutter Interference: Some installers incorrectly assume gutters alone solve the problem. They don’t—water still flows behind siding before reaching gutters without proper flashing.
Lack of Understanding: Many roofers and siding contractors simply don’t understand kickout flashing requirements or assume “step flashing” alone is sufficient (it’s not).
Step Flashing vs. Kickout Flashing: What’s the Difference?
This confusion contributes to missing kickout flashing:
Step Flashing: L-shaped metal pieces installed in a stepped pattern where roofs meet walls running parallel to the roof slope. Each shingle course gets a piece of step flashing woven between shingles and tucked under siding. Step flashing handles water running down the wall-roof junction.
Kickout Flashing: Specially formed flashing at the END of a step flashing run where the roof terminates at the wall. Kickout flashing catches all the water that step flashing has been channeling and redirects it away from the wall into the gutter.
The mistake: Installers often run step flashing correctly but fail to install kickout flashing at the critical end point. Water follows step flashing down to the termination point, then pours directly into the wall because there’s no kickout to redirect it into the gutter.
What Your Inspector Sees
During Winchester home inspections, I look specifically for kickout flashing at all roof-to-wall transitions. Here’s what I evaluate:
Presence or Absence: Is kickout flashing installed at all vulnerable locations?
Proper Installation: Even when present, kickout flashing must be installed correctly:
- Extends beyond the wall face far enough to clear siding
- Properly integrated with step flashing above
- Sealed and secured to prevent water infiltration
- Sized appropriately for roof runoff volume
- Directs water into gutter, not past it
Evidence of Water Damage: Missing kickout flashing usually creates visible clues:
- Staining on siding below the roof-wall junction
- Peeling paint or finish deterioration
- Soft or rotted trim boards
- Gutter overflow staining
- Efflorescence or mineral deposits
- Mold or mildew growth on exterior surfaces
Associated Problems: I also check for secondary damage inside if access permits:
- Attic water stains near affected junctions
- Interior wall or ceiling damage below problem areas
- Moisture in wall cavities
What to Do If Your Inspector Says It’s Missing
If your home inspection report identifies missing kickout flashing, take it seriously. Here’s your action plan:
If You’re Buying the Home:
During Inspection Period:
Request Repair or Credit: Missing kickout flashing is a legitimate repair request. Ask the seller to:
- Install proper kickout flashing at all required locations
- Repair any water damage caused by the missing flashing
- Provide documentation of professional installation
Get Professional Estimates: If sellers won’t make repairs, obtain quotes from licensed roofers or siding contractors for proper installation plus any necessary damage repair. Use these estimates to negotiate closing credits.
Consider Severity: If extensive water damage exists from years without kickout flashing, you may need:
- Structural engineer evaluation
- Extensive wall reconstruction
- Mold remediation
- More comprehensive estimates affecting your offer
Prioritize Appropriately: Missing kickout flashing is important but typically not a deal-breaker. It’s fixable, and costs are usually manageable ($200-$800 per location for installation, more if damage repair is needed).
If You Own the Home:
Address It Promptly: Don’t delay once you know kickout flashing is missing. Every rain event causes additional water intrusion and damage.
Hire Qualified Contractors: Kickout flashing installation requires:
- Understanding of proper flashing integration
- Metal fabrication skills (kickout flashing is often custom-formed)
- Siding removal and reinstallation
- Proper sealing and weatherproofing
Use licensed, experienced roofers or siding contractors, not handymen. This is specialized work.
Assess Existing Damage: Before installing kickout flashing, evaluate whether water damage already exists:
- Are trim boards soft or rotted?
- Is paint peeling or finish failing?
- Are there interior signs of moisture?
Address damage during kickout flashing installation—opening walls for flashing work provides access to repair hidden rot.
Document Everything: Take before and after photos, keep receipts, and document repairs. This information is valuable for:
- Insurance claims if damage is extensive
- Future home sales (showing you addressed the issue properly)
- Warranty purposes with your contractor
What Proper Installation Looks Like
Professional kickout flashing installation involves:
Metal Fabrication: Custom-forming metal (typically aluminum, galvanized steel, or copper matching roof flashing) into the proper kickout shape. Pre-formed kickout flashing products are available but often require modification for specific applications.
Siding Removal: Carefully removing siding in the affected area to access the wall sheathing and integrate flashing properly.
Integration with Step Flashing: Connecting kickout flashing to the end of the step flashing run so water transitions seamlessly from step flashing into kickout flashing.
Proper Sealing: Sealing all edges and joints with appropriate sealants to prevent water infiltration behind the flashing.
Siding Reinstallation: Reinstalling siding over the kickout flashing, ensuring water can’t get behind the flashing but the flashing extends far enough to clear the siding face.
Gutter Coordination: Positioning kickout flashing to direct water into the gutter effectively. Sometimes gutter adjustments are needed to align with kickout flashing discharge.
Cost Expectations
Kickout Flashing Installation (per location):
- Simple installation: $200-$400 per location
- Complex installation requiring siding removal/reinstallation: $400-$800 per location
- Custom metal fabrication: May add $100-$200
Additional Costs If Damage Exists:
- Trim board replacement: $100-$300 per board
- Wall sheathing repair: $200-$600 depending on extent
- Framing repair: $500-$2,000+ if studs or structural members are rotted
- Interior drywall/paint repair: $300-$1,000 if water penetrated inside
- Mold remediation: $500-$3,000+ if mold growth is extensive
Total Project Costs:
- Minor (1-2 locations, no damage): $400-$1,200
- Moderate (3-5 locations, minor trim repair): $1,500-$3,500
- Extensive (multiple locations, significant rot repair): $3,000-$8,000+
These costs are far less than ignoring the problem. Years of water damage can require $10,000-$30,000+ in structural repairs, siding replacement, and interior restoration.
Winchester-Specific Considerations
Historic Homes: Old Town Winchester properties and historic homes often lack kickout flashing entirely. When adding it:
- Choose flashing materials and colors matching existing roof/trim
- Work with contractors experienced in historic property requirements
- Check whether historic district approval is needed for exterior work
Common Local Roof Styles: Winchester’s housing stock includes many dormered Cape Cods, colonials with additions, and homes with complex rooflines—all prone to kickout flashing issues. These architectural features create multiple roof-to-wall junctions requiring protection.
Climate Factors: The Shenandoah Valley receives 35-40 inches of annual rainfall plus significant snow. Our freeze-thaw cycles exacerbate water damage from missing kickout flashing. What might be a minor issue in dry climates becomes serious here.
Prevention for New Construction or Additions
If you’re building an addition, replacing a roof, or constructing a new home:
Specify Kickout Flashing: Make it explicit in contracts that proper kickout flashing is required at all roof-to-wall transitions.
Review Plans: Before work begins, identify all locations where kickout flashing will be needed and confirm contractors understand requirements.
Inspect During Construction: Before siding goes up, verify kickout flashing is installed. Once siding covers flashing, confirming proper installation becomes difficult.
Use Quality Materials: Don’t cheap out on flashing materials. Copper or heavy-gauge aluminum and galvanized steel provide long-lasting protection.
Photograph Installation: Document proper kickout flashing installation for future reference.
Bottom Line
Kickout flashing is a small component with huge importance. Its absence is one of the most common defects I find during Winchester home inspections, and the resulting water damage can be severe and expensive.
If your inspector identifies missing kickout flashing, don’t ignore it. Address it promptly with qualified contractors, assess any existing damage, and protect your home from ongoing water intrusion. The few hundred dollars spent on proper installation prevents thousands in future repairs and protects your largest investment.
Water damage doesn’t improve with time—it only gets worse. Take action now, before minor water intrusion becomes major structural problems.
Concerned about kickout flashing or water intrusion in your Winchester home? Trefoil Home Inspections identifies critical flashing defects and water damage risks throughout Winchester, Frederick County, and the tri-state area. We’ll show you exactly where problems exist and what needs attention.